6. Backups
Our Hosting backups use the latest in advanced server-based technology to be fast (nearly instantaneous), because of almost no server load and are extremely space-efficient.
We do not charge any additional fees for hosting backups or their storage; they are included with each site plan and cannot be disabled.
While our hosting backups are reliable and redundant, members seeking extra peace of mind can create manual or cloud backups at any time, and this guide discusses how to do that.
Worried about the worst case scenario? Check out our blog post on Safe Automated Hosting Backups for details on how WPMU DEV’s managed hosting keeps you safe with remote redundancy and automated backup storage across multiple devices and facilities.
6.1 Hosting Backups
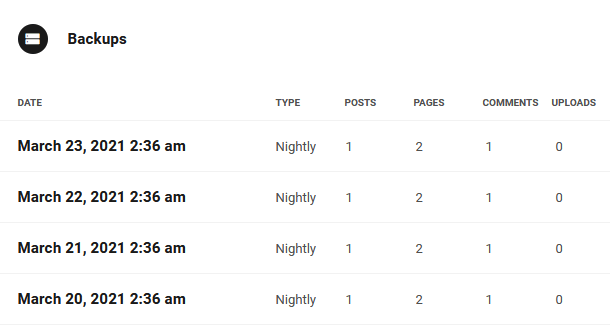
Copy chapter anchor to clipboardIncremental hosting backups occur automatically:
- Every night
- Prior to WordPress updates
- When a staging site is pushed to production
- When a new primary domain is selected
- Prior to Automate updates
Need More Backups? An add-on is available for all hosted sites where you can have backups made every hour. See Hourly Backups in the Add-Ons section of Your WPMU DEV Account for details. Note that, just like the regular nightly backups, hourly backups do not affect your hosting storage. See our Hosting Backups FAQ for more info.
See the Incremental Backups chapter below for details on how that works and why it’s better for you.
A full backup of each site is made every 15 days. Currently, we only back up production files and data. We do not back up staging sites, but they can be backed up manually via SFTP, or by using a plugin.
A copy of the most recent backup is stored locally to speed up subsequent backups. All other backups are encrypted and stored in a remote datacenter in the same general region as your site (USA, EU, Canada, etc) and are redundantly stored on multiple devices across multiple facilities.
Hosting backups remain in remote storage for 30 days and are automatically removed after that. During the 30-day period, you cannot manually delete any of the backups kept. Once they have been automatically removed, they cannot be restored.
Please note that manual and hourly backups are not available for sites hosted on the Quantum plan. See Quantum Plan Restrictions for details.
6.2 Incremental Backups
Copy chapter anchor to clipboardAs noted above, a full backup is made every 15 days. All other backups —both automatic and manual— are incremental backups, and understanding what that means is important.
In simplest terms, an incremental backup copies and stores only data that has been changed since the last backup. When you look at your backup list and see multiple backups created during the past several days, you are not looking at multiple copies of your full site, but rather the incremental changes that have been backed up since the last full backup.
Incremental backups are superior to traditional backups in a number of ways; perhaps most importantly, they are small and fast. This allows us to back up your site more frequently. Consider this example: Your 500MB site was backed up last night and today you added 5MB of data. You want to protect the new data, but why backup the entire site when 99% of its data hasn’t changed? Instead, the next backup will include the new data only and will have the smallest possible impact on your storage capacity, has a negligible impact on server load and takes place in the blink of an eye.
Whenever a backup is restored or downloaded, these incremental backups are merged with the last full backup to produce a full up-to-date copy of the site. For more on restoring from backup, see our Restoring from Backup documentation below.
6.3 Manual Backups
Copy chapter anchor to clipboardManual backups can be accomplished in multiple ways:
- Via the Hub
- With a WP CLI command over SSH
- Using our REST API (Coming Soon)
These are detailed in the sections below.
Note that, just like automatic hosting backups, creating a manual hosting backup will not back up the staging environment if one exists. The staging site can be backup up via SFTP or with a plugin like Snapshot if needed.
6.3.1 From The Hub
Link to chapter 3Begin on the Hub’s main page (My Sites) and click the site you wish to back up, then select Hosting > Backups in the sidebar menu.

You can trigger a new backup by clicking on New Backup.

A progress indicator will appear once you start the backup and once finished, the manual backup will appear at the top of your list of backups.

For more tools, click on the three-dot icon next to the desired backup.
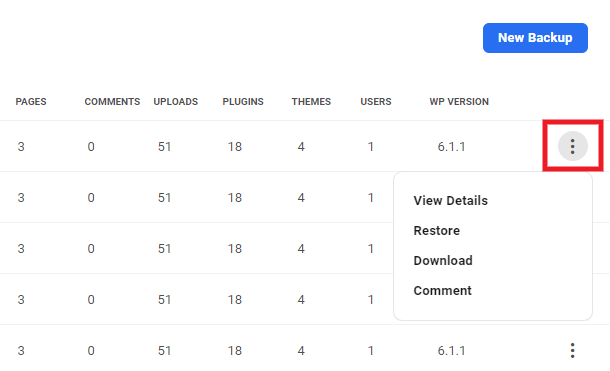
You can Restore your site, Download a zipped copy of any backup, and optionally add a personal Comment to any backup.
Clicking the View Details option for any backup will pop open a modal window with info about that specific backup.

6.3.2 Backup via WP CLI
Link to chapter 3The WP-CLI, WordPress Command Line Interface, allows users to perform actions by entering commands in the command shell or Apple terminal app. It’s a highly efficient way to accomplish many tasks, but it requires some knowledge of code. If you aspire to be a WordPress developer we encourage you to learn to use WP CLI commands; if not, you should manage your backups from The Hub. You can damage your site with WP CLI commands if you aren’t careful.
Create an SSH User
Only an SSH user created by you can access your site via WP CLI. If you haven’t created an SSH user you’ll need to do that before you can begin the steps below. See our SFTP/SSH documentation for guidance on creating an SSH user.
Log in to Remote Server
To log in to the remote server via the WP CLI you will need your SSH password and a command that identifies your site. Click the Details icon for your SSH user to locate the command.

The popup that appears shows the command that, along with your SSH password, allows you to access your site’s files via the WP CLI. Copy the command.

Open a command shell and follow these steps. The image below shows what the process looks like in the shell.
- Paste the command you copied from the SSH Details popup into the command line.
- The first time you access any site via the shell, you must approve a security certificate. When prompted, enter Yes into the command line to approve the certificate.
- Enter the password for the SSH user you are working with.

The WP CLI will open and you can begin entering commands. Advanced users who intend to frequently work in the shell can access a list of WPMU DEV custom commands by entering ‘wp help hosting’ in the command line.

Custom Backup Command
You can trigger a backup from the WP CLI with our custom command:
wp hosting backup create

Note that this backup is identical to our WPMU DEV hosting backups and will appear as a manual backup in the Backup list in your Hosting control panel.
6.4 Restoring from Backup
Copy chapter anchor to clipboardBackups can be restored via The Hub control panel on the backups tab, via the WP CLI and soon you will be able backup using our REST API.
While restoring from backup most control panel functions will be disabled, and your production and staging sites will show a maintenance screen with a 503 HTTP response code. How long a restore takes depends on the size of the backups involved and how long they take to download to your server.
Due to the architecture of our staging environments, restoring a backup will trigger a re-sync of staging. So if you’ve made changes to your staging environment that you want to keep but they haven’t yet been pushed to production, you should manually back those up before restoring your site. Manual backups can be made either via SFTP or by using a plugin like Snapshot.
Any time you restore a backup, it is the full up-to-date backup that is used as noted in the Incremental Backups chapter above.
6.4.1 Restore from The Hub
Link to chapter 4Begin on the Hub’s main page (My Sites) and click the site you wish to back up, then select Hosting > Backups in the sidebar menu.
Click on the right three-dot icon for the backup you wish to restore, and click Restore.
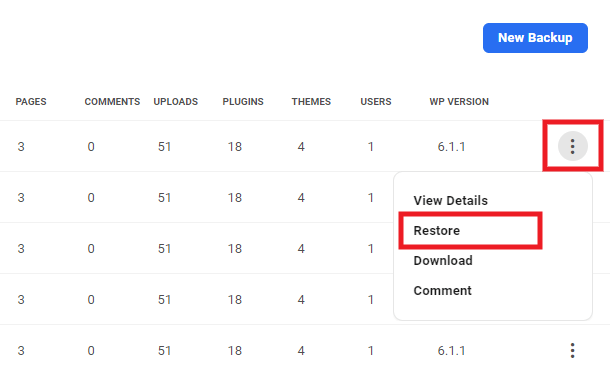
Type RESTORE at the confirmation step. Then click Confirm and Restore to confirm the action.

Note that if you currently have a staging environment set up for the site you’re restoring, an alert will pop up to remind you that the staging environment will be deleted when you initiate the backup restore. Click Delete staging and begin restore to proceed.

6.4.2 Restore via WP CLI
Link to chapter 4WP-CLI, WordPress Command Line Interface, allows users to perform actions by entering commands in the command shell or Apple terminal app. It’s a highly efficient way to accomplish many tasks but requires some knowledge of code. If you aspire to be a WordPress developer we encourage you to learn to use WP CLI; if not, you should restore your site from the Hub. You can damage your site with WP CLI commands if you aren’t careful.
Create an SSH User
Only an SSH user created by you can access your site via WP CLI. If you haven’t created an SSH user you’ll need to do that before you can begin the steps below. See our SFTP/SSH documentation for guidance on creating an SSH user.
Log in to the Server
To log in to the remote server via the WP CLI you will need your SSH password and a command that identifies your site. Click the Details icon for your SSH user to locate the command.
The popup that appears shows the command that, along with your SSH password, allows you to access your site’s files via the WP CLI. Copy the command.
Open a command shell and follow these steps. The image below shows what the process looks like in the shell.
- Paste the command you copied from the SSH Details popup into the command line.
- The first time you access any site via the shell, you must approve a security certificate. When prompted, enter Yes into the command line to approve the certificate.
- Enter the password for the SSH user you are working with.
The WP CLI will open and you can begin entering commands. Advanced users who intend to frequently work in the shell can access a list of WPMU DEV custom commands by entering the following in the command line:
wp help hosting
Initiate the Restore
You need to be in the home directory for this to work. To ensure that you are in the correct directory, use this command line:
cd ~
Next, enter the following command to access a list of this site’s current backups in storage:
wp hosting backup list
The backups that appear in this list are identical to those that appear in the Backups tab of The Hub.
Locate the backup you want to restore and copy its ID.

Enter the following command, replacing the ‘x’s‘ with the backup ID:
wp hosting backup restore xxxxxxxx
For example, the command to restore the backup indicated above would appear like so: wp hosting backup restore prod_incremental_20210616172310_HQwg5 in the command line, as shown below.

A success message will appear when the restore begins, but keep in mind that the restore process may take a few minutes depending on the size of your backups and how long they take to download to your server.

6.5 Exporting Backups
Copy chapter anchor to clipboardHosting backups can be exported and downloaded via The Hub. Any time you download a backup, it is the full up-to-date backup that is exported as noted in the Incremental Backups chapter above.
In the Hosting section of your site, click Backups.
Scroll down to the backup you want and click on the ellipsis icon at the far right of that backup’s row to reveal the options. Then click on Download.
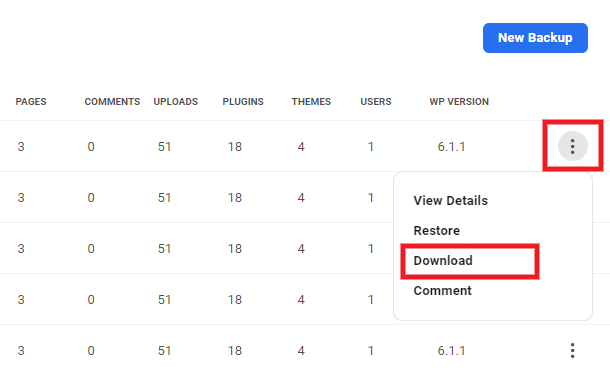
A notice will appear in a few moments to let you know that the system is packaging the backup for export, and will send you an email as soon as that’s done.

Shortly after, you’ll receive an email with the link you need. Click the Download button in the email.

The download link in the email will be valid for 7 days. If you need to download that same backup after the link has expired, remember that your hosting backups are stored for 30 days, so simply repeat the above process to generate a fresh download link.
Once you have requested a backup download, you must wait 2 hours before requesting another of the same backup. This is to help prevent overloading the system with spammed requests.
6.6 Snapshot Plugin
Copy chapter anchor to clipboardHosting backups use a different system than the backups provided by the WPMU DEV Snapshot plugin (snapshot and cloud backups). Because we have access to the server infrastructure for sites we host, we can create and restore backups much faster and efficiently.
Did you know that WPMU DEV supports multiple ways to backup sites, including hosting backups, managed backups, and backups created with either of two versions of our Snapshot plugin? To help you make an informed decision on which backup option is best for your project, see our Backups FAQs doc.
6.7 Get Support
Copy chapter anchor to clipboardIf you still have questions or need assistance after reading this document, please don’t hesitate to contact our support superheroes using the available options under the Support tab in your Hub or via the Support tab in your WPMU DEV Dashboard.


